
i am sharing a project created using the awesome Xyron adhesives we received, paired up with a couple of fab Crafter's Companion products. BUT... i am also sharing a photo tutorial on how i made it.
we received a fabulous adhesive kit and were asked to do SOMETHING for the 30 Days of Holiday Projects event! there are PRIZES! leave your comments on the Xyron Facebook page and Crafter's Companion and design team blogs to win super sweet goodies from both awesome companies!
so i made SOMETHING... i altered this box - can't remember what i had in it, but it was probably junk!

the first thing i did was grab a sheet of 6x6 patterned paper for the inside bottom of the box. it needed to be trimmed slightly to fit:

next, i busted out my Ultimate Tool for some scoring action. the scoring part was easy, but because the box is bulky, i trimmed some of the edges where the folds met in order to get a nice, snug fit when i adhered the papers.

et voila! adhered with the Xyron Mega Runner and it was a great fit!

next, i needed some trims so the cardboard wouldn't look so drab. i sliced up some shimmery (and flimsy) paper and some ricrac, but i wasn't feeling confident it would all stick down with just the tape runner. instead, i ran them through the Xyron Sticker Maker for a good, permanent bond:

remember to burnish! i rubbed down hard on all of the strips (notice how i doubled up to conserve adhesive? i'm thrifty that way, and it worked great!)

next up, preparing the sentiment! i had something very specific in mind, and i went pretty simple, with white cardstock and the Die'sire Embossalicious 6x6 folder "Holiday Holly" and ran it on through my C'bug:

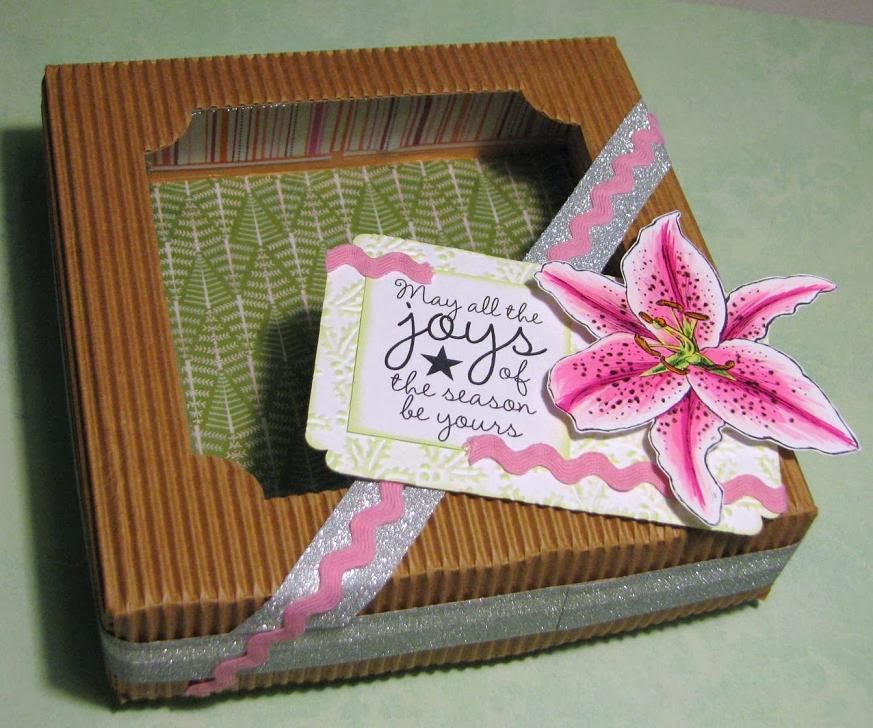
simple embellishing here - i punched the corners and inked the edges and the raised surface with a light green chalk ink. stamped my sentiment from Stamp-It Australia's new Christmas line, Twinkle (this set is Falling Snowflake) on plain white cardstock and inked those edges too:

added the trims and used Xyron Adhesive Dots to adhere my sentiment and the image i'd coloured - this is Sheena's A Little Bit Floral (Lily), coloured up my Spectrum Noir markers (PP1, BP1, BP3, BP7, DR7, CT2, LG3, DG3, OR1, TN7)... click to enlarge!

this was the inspiration for my colouring (next time i'll stamp it in a really light colour)... :)

annnnnnd the finished box! i can add candies or votive candles or a set of notecards or something cute all nestled in pretty tissue paper. or maybe even rolls of washi tape!
LOVED working with the Xyron adhesives for this project - HUGE thanks to our awesome sponsor/partner for this event! and i KNOW you'll see lots of other amazing inspiration - just pop on over to the Crafter's Companion blog, visit the blogs of the rest of the awesome Crafter's Companion USA Design Team, check out our Facebook page, and visit Xyron on Facebook, and tell them i sent ya! :) leave your comments everywhere by Monday, November 18th to win stuff, too, and maybe you'll get the awesome new Xyron 3" Sticker Maker! (I WANT THAT) or some other fantastic prize. regardless, thanks for joining me today, and have a WONDERFUL weekend! :)
Your lily is beyond words! The lily is my favorite flower and yours looks so realistic!
ReplyDeletelove your box!!!
ReplyDeleteYour altered box turned out lovely!
ReplyDeleteI'm a sucker for a pretty box, and this one is beautiful! It would make a great gift, even completely empty! ;)
ReplyDeleteYour box came out awesome!
ReplyDeleteAwesome gift box. I love the flower. Great job.
ReplyDeleteGreat gift box!!
ReplyDelete